During the process of making this cake, I decided it’s the ‘Yotam Ottolenghi’ of desserts, although you may think he would be something that is rather more extravagant, he’s really not, and I’ll tell for you why. From the outside, this seems like a rather simple thing to make – especially compared to the other recipes in this book,- but oh no! In reality, it made me – as always- lose the will to live, (but I will admit the almost fuchsia pink colour of this cake is pretty incredible!) this cake was, to put it lightly, a pain in the ass!
I often bake just for fun or as a stress reliever (which is ironic given the fact that Ottolenghi makes my stress levels escalate drastically) but this time it was for my lovely godmother who came to visit myself and my family from Oxford, my mother was the one who chose this recipe and thinking it was a simple and quick recipe, I proceeded.
I really should have seen the red lights in this recipe after I spent 35 minutes searching for raw beetroot, but I was young and naive.
In the process of making this cake, the first thing you are told to do is to preheat the oven and roast the walnuts for around 10 minutes, remove from the oven and chop into 1cm sized pieces. Instead, after taking them out the oven I just set them aside and then proceeded to chop them right before they were needed, I wouldn’t recommend doing this unless you have a large kitchen or a large work surface area, as having a large baking tray hanging around the work area proved to be rather inconvenient, but I’m impatient and couldn’t wait to actually start this recipe, so that’s what I did!
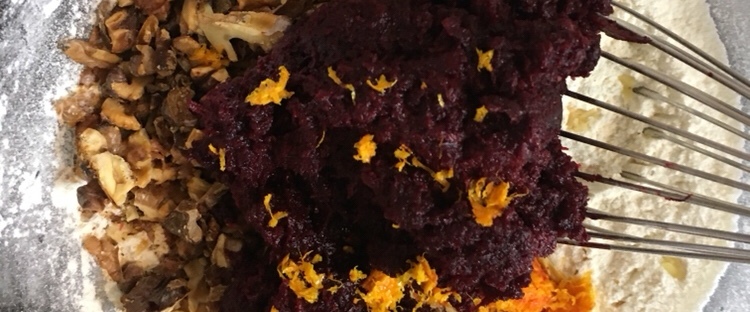
Afterwards, you are told to add the flour, sugar, baking powder, bicarbonate of soda and salt into a large mixing bowl and then whisk to combine, which didn’t prove to be too much of a task, and at this point, everything was going great. But the next step was infuriating, to say the least, but I did learn a lesson I should have learned a long time ago, read and RE-READ a recipe over and over in you know the following procedure without hesitation, if I had done this, I would have realised that it wanted you to only grate the ginger finely and not the beetroot as well, so this lead to me using the MICROPLANE to grate two and a half pieces of beetroot, but I will say its a great arm workout though! After an agonising 20 minutes of continuous grating, I was finally done!
The next step was very easy, and thankfully so given the amount of emotional (and physical) pain I had just endured, all that I needed to do was place the eggs and soured cream into a bowl and whisk to combine, followed by adding the oil and vitamin C tablet (yes I too found this rather odd but after reading the introduction to the recipe at the top of the page I discovered that it helps to preserve and ‘set’ the colour of the cake.) After the mixture was fully combined, I added it to the beetroot, orange and flour mix, which was very simple and m I mixed it using a tough wooden handled spatula!
After the mix was combined and had transformed into that exciting magenta colour, I placed it into a lined cake tin and put it in the oven. The recipe says to leave it in for 50-55 minutes but after checking it after 20 (checking my bakes after around half the time is something I do every single time I cook, I highly recommend doing so!) I thought it needed only about 15-20 minutes. I took it out of the oven 20 minutes later and left it to cool in the pan for a while.
Now it was time to make the icing YAY! (please note the sarcasm because this part actually turned out to be WORSE than grating 2 and a half pieces of beetroot on a Microplane!!) beating the cream cheese was obviously very simple, adding the icing sugar would have gone smoothly if my mind had been 100% focused because I accidentally turned the Kitchen Aid on full causing it to fly everywhere, and although I was frustrated I laughed at my own stupidity, this was before my sense of humour failure that occurred only a few seconds afterwards! Once the icing sugar and cream cheese were fully incorporated it was time to add the ginger juice, which involves me having to use my good ol’ friend the microplane to grate one 6cm (I used ALOT more than 6cm) piece of ginger over a fine-mesh sieve over a bowl, and the flesh squeezed to extact all the juices, 20ml worth of jucies, doesn’t really sound very difficult but this was the point to which I (as always whilst in the midst of cooking anything by Yotam Ottolenghi) contemplated my exitence. The grating of the ginger alone took 20-25 minutes, but that wasn’t even the worst part! At this point I no longer had any bowls of mugs apart from one little espresso mug and I thought “oh thatll be fine its just a sieve on top,” so I put the grated ginger into the sieve over the mug and pushed it down with a dessert spoon, literally from about half of my ginger a drop of juice was produced, and I didn’t realise that all of the ‘good stuff’ is what comes through the sieve and stays on the bottom of the sieve and doesn’t fall, this is then squashed to produce the juice, so I THREW IT AWAY, and got some more ginger and repeated the process but this time I just put in the bits that came through the sieve, this entire process had lasted around 15 minutes and I was tired and bored! Finally I had 15ml of sieved pulp (15ml is the amount I decided I was going to use after 45 minutes of grating and pushing ginger through a sieve) but I then went back and re-read what the recipe says to do with the ginger as I was confused on how to make the actual juice, so I squashed it to create the ginger juice, the 45 minutes and 15 ml of pulp created about 5ml of ginger juice! So I continued to grate and sieve and thankfully this only took 15 minutes and I finally had my 15ml of juice!! That is of course until my mother walked in and saw me using her espresso mug that she had apparently told me “not to use,” so at seeing this she picked up the mug which caused my measuring spoon to spill all over the counter and onto the floor and it was completely unsalvageable! Fortunately, we had a little bit that hadn’t spilt still left in the measuring spoon!
This was all very unhelpful and very stressful given the fact I was going out for dinner and I had -5 minutes to get there in order to be on time and in just over two hours I was meeting a friend for drinks! I had to act quick so I removed the cake from the tin and left it to cool further on a rack and covered the bowl of icing with clingfilm and left it in the fridge, then I went out to enjoy my dinner! I iced my cake very quickly and left the restaurant early in order for me to finish it before I had to go out again, thankfully the cake was completely cool and the icing went on like a dream! We didn’t actually get to eat the cake until the following day but apparently it was brilliant, I didn’t eat any I was far to sick of it, the only thing I wanted to do with it is hurl it out the window!
All in all, this cake was very very stressful to make but had brilliant results! I would definitely recommend, just try not to use your mothers favourite espresso mug and don’t use a bloody Microplane to grate the beetroot, although I do think that it added to the magenta colour of the cake due to the bits being finer! I don’t think I’ll be making this cake again anytime soon, I think I’ll allow my self to forget the pain, in my mind this was like giving birth, I’ll make another one once I’ve forgotten how agonisingly painful it was!
2 recipes down, 110 more to go!
Below I have attached a visual step by step of my process!


Hey Gu! Lol! Can imagine the kitchen! But sounds delicious… Would love to make it but don’t think I have your skill…
LikeLiked by 1 person
Hey Sarah!! The kitchen isn’t usually too ghastly (mum would probably say different though!!) I didn’t actually have any (not enough chocolate for gu’s taste) but i was told it tasted great! Try! I’ll send you the recipe if you want! haha thank you but I’m sure I don’t have any more skills than you! Just try not to grate use a micro-plane fore the beetroot! xx
LikeLike
Fascinating blog! Is your theme custom made or did you download it from somewhere? A theme like yours with a few simple tweeks would really make my blog shine. Please let me know where you got your design. Thanks
LikeLike
Thank you! I used a theme from wordpress and added my own flair to it by changing up the colours and adding pictures! i also designed a logo using ‘logoservices’ x
LikeLike
I’m really inspired with your writing talents as smartly as with the layout to your blog. Is that this a paid theme or did you customize it your self? Either way keep up the excellent quality writing, it is rare to see a great blog like this one today..
LikeLike